Security Role Fields
This section covers the fields contained in the Add: Security Role and Edit: Security Role panels.
 NOTE: The Edit: Security Role panel contains all the items displayed on the Add: Security Role panel as well as a few additional items. Therefore, only the Edit: Security Role panel is displayed and explained here.
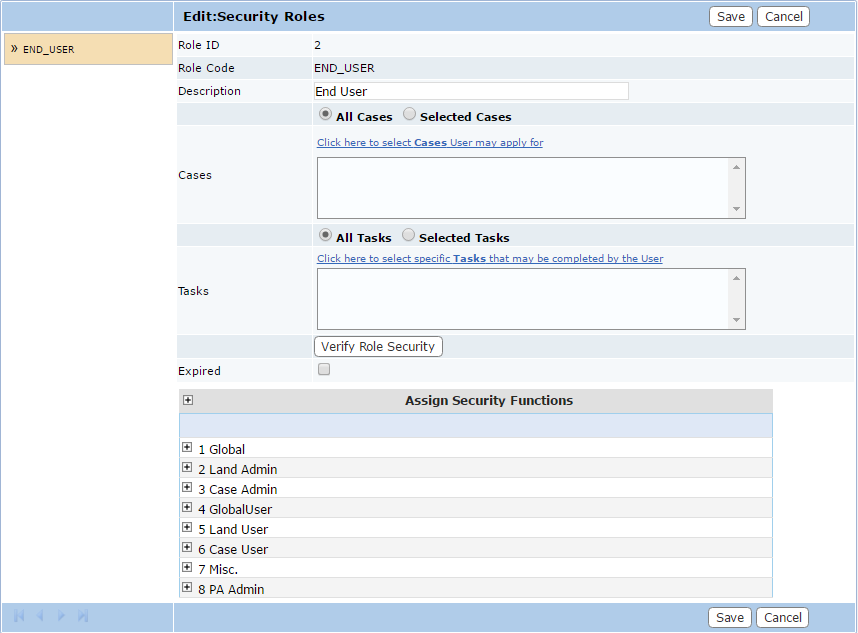
- Role ID: This is a numerical identifier automatically generated by the system.
- Role Code: Enter a 10-character code to identify the security role.
- Description: Provide a brief description of the security role.
- Cases: This field allows you to select which cases users in this role may apply for. Click the link above the field to open a selection window.
- Tasks: This field allows you to define which tasks users in this security role may mark as complete. Click the link above the field to open a selection window.
- Verify Role Security: This button verifies and updates the access definitions for the specified security role. It becomes important as new security roles are added because the access definitions can become outdated as new functionality is added to the system. For example, if a security role was created a year or two ago, and since that time several new pages were added to the system, those new pages may have security options that the old security role doesn't know about yet.
Pressing this button will go through the role and compare the security definitions with the current or latest definition in the system. If there are any missing entries, they will be populated in the proper table so the new pages or functions can be made available to users in this security role. - Expired: This check box, when selected, indicates that the record is expired and is no longer available to or usable by PLL users.
- Assign Security Functions: Expand each security category and select the check boxes next to the appropriate functions.

