User Fields
This section covers all the fields contained in the Add: Users and Edit: Users panels.
 NOTE: The Edit: Users panel contains all the items displayed on the Add: Users panel as well as a few additional items. Therefore, only the Edit: Users panel is displayed and explained here.
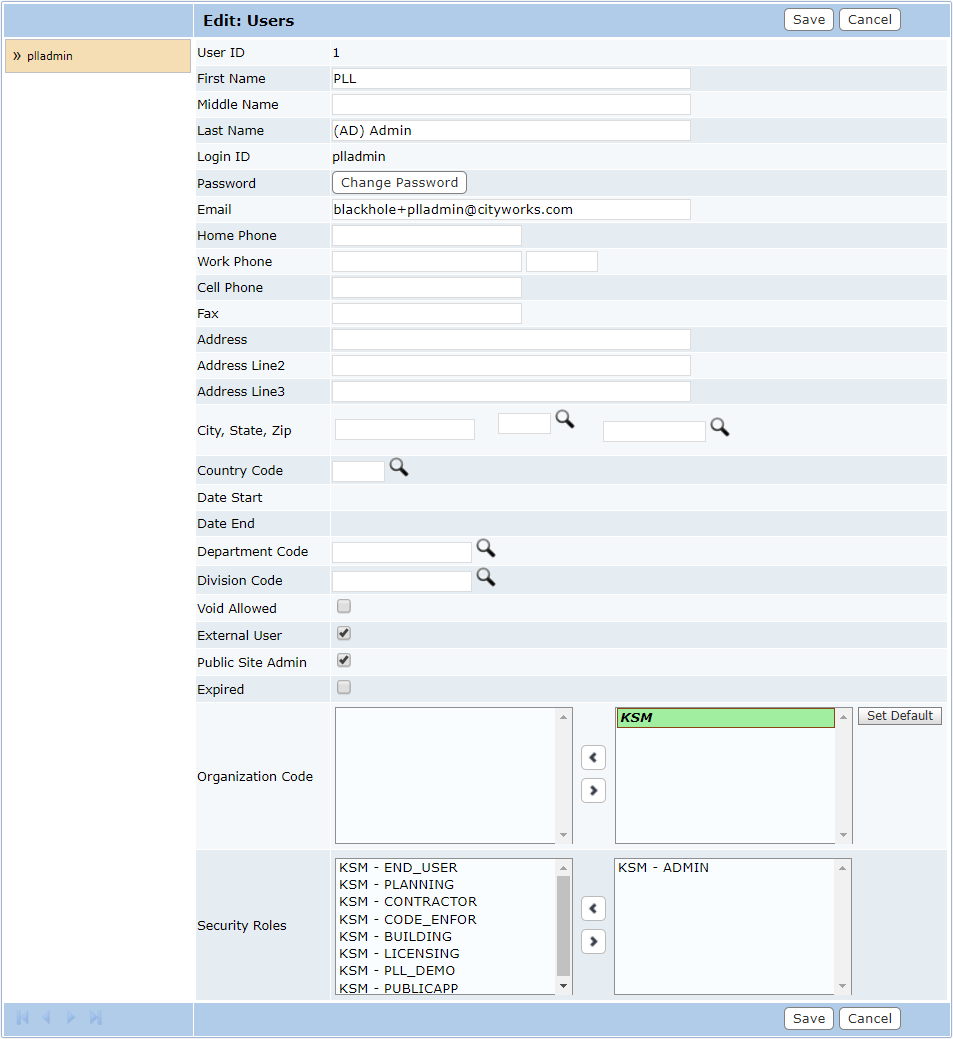
- User ID: This is a numeric identifier that is automatically assigned to the user after it is saved. On the Edit: User panel, the blue arrow to the right of this box allows administrators to collapse or expand the panel.
- Name: These three fields are for the user’s first, middle, and last names. Provide as many as possible.
- Login ID: This field is for the user’s unique login ID, used to access Office for PLL.
- New and Confirm Password: These fields are for creating an initial password for the user. It is a best practice to have all users pick a new password after logging in for the first time.
NOTE: After the user profile has been saved, these boxes are replaced by a Change Password option on the Edit: Users panel. This allows the administrator to change a user’s password.

- Contact Information: These lines are for the user’s contact information, including email address, phone and fax numbers, and home address. Click Lookup to select state, zip, and country codes.
- Date Start: This is either the date the user was hired, or the date the user was added to Office for PLL, depending on the preferences of the organization. If this field is left blank, it will automatically be assigned the current date when the record is saved.
- Date End: This is an optional field and may be used as the administrator sees fit.
- Department and Division Codes: These fields identify which department and division the user belongs to. Click Lookup next to each field to select the appropriate department or division and click Submit. This will add the department code to the division and close the selection window.
- Void Allowed: This item is currently under development.
- External User: This check box, when selected, indicates the user will have access to Public Access.
- Public Site Admin: This check box, when selected indicates the user has access to the Admin page in Public Access.
- Expired: This check box, when selected, indicates that the record is expired and is no longer available to or usable by PLL users.
- Organization Code: The left-hand column displays a list of all organizations in the system. The right-hand column displays those organizations currently associated with the user. To add an organization to the user, select one from the left-hand column and click >.
- Set Default: This button designates the first organization code in the right hand field as the default organization for the user. If you select a different organization code in the right-hand field and click this button, that organization code will become the user's default organization.
 IMPORTANT: The organization code must already be saved to the user profile before the Set Default button will be activated. If the code has been moved to the right hand field but the profile has not been saved, clicking Set Default will only return the organization code to the left hand field.
- Security Roles: Here administrators can easily view and assign security roles to each user. The available security roles are listed in the field on the left. To add security roles to a user's profile, select the desired role in the left-hand box and click > to move it to the right-hand field. That security role is now assigned to the user.

