Flags Fields
This section covers all the fields contained in the Add: Flags and Edit: Flags panels.
 NOTE: The Edit: Flags panel contains all the items displayed on the Add: Flags panel as well as a few additional items. Therefore, only the Edit: Flags panel is displayed and explained here.
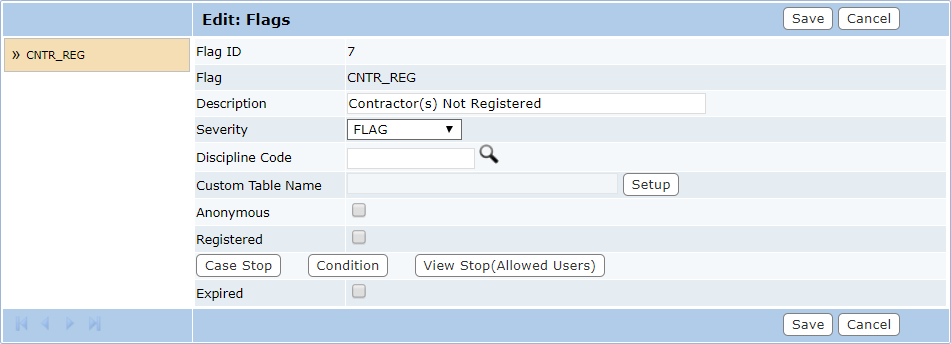
- Flag ID: This is a numeric identifier that is automatically assigned to the flag after it is saved. This field cannot be changed.
- Flag: This is a 10-character identifier created by the administrator. This code appears in lists and drop-down lists and allows users to distinguish one flag from another. This field cannot be changed once the flag has been saved.
- Description: This is the content of the flag. The contents of this field will scroll across users’ screens when the flag is activated. Make sure this information is specific but concise.
- Severity: This field helps define how the flag will affect the case and its workflow. Select one of the following options from the drop-down list to assign it to the flag.
- Discipline Code: This is a code used to identify any work role needed to complete the case requirements, such as plumber, framer, soils engineer, landscape design, etc. Click Lookup to the right of the field to select the appropriate discipline code, then click Submit to save the code to the flag and close the selection window.
- Custom Table Name: This field identifies any custom tables associated with the flag. See Use the Custom Data Builder for more information.
- Anonymous: This field is no longer active.
- Registered: Select this check box to indicate the item will be available to Public Access users after they have logged in to the system.
- Case Stop: Click Case Stop to display a field listing the case types to which the flag will apply a case stop. This flag cannot be used if the case type has not been selected. To select a case type, click the blue link above the field. When the selection window opens, select the desired case types from the left-hand list, then select the right arrow. This will move the selected case types to the right-hand field (labeled Case Stop Severity On:). If the flag is activated on any of the selected case types, it will automatically apply a case stop severity until the flag is resolved.
- Condition: This button allows administrators to apply conditions to the flag. In other words, if this flag is activated on a case, the conditions defined here must be met before the case may progress. Click Conditions to display an empty field with a link at the top that says Click here for Condition. To add a condition to the flag, click the link at the top of the field. This will open a selection window containing two large fields. The field on the right shows those conditions already associated with the flag, while the field on the left shows a list of available conditions not yet added to the list. Select a condition on the left and click the right arrow to add it to the flag; select one from the right-hand field and click the left arrow to remove the condition from the flag. The up and down arrows organize the list. After the desired items have been added to the right hand field, click Submit to add them to the flag and close the window.
- View Stop:(Allowed Users): The View Stop flag severity prevents any users, except those specifically identified, from viewing the case. View Stop allows the administrator to identify users who will be able to view the case and remove the view stop once the specified requirements are met.
- Click View Stop to display a list of all users authorized to see and edit cases under the view stop. To add or remove users from this list, select the link at the top of the field. The link opens a selection window containing two large fields. The field on the right shows those users already associated with the template, while the field on the left shows a list of available users not yet added to the list. Select a user on the left and click the right arrow to add it to the required list; select one from the right-hand field and click the left arrow to remove the user from the list. The up and down arrows organize the list. After the desired users have been added to the right-hand field, click Submit to add them to the case template and close the window.
- Expired: This check box, only visible on the Edit: Flags panel, allows administrators to mark a flag as expired. The corresponding check box on the main Flags panel will automatically be selected as well.

