Receive Serialized Material
Receive allows you to track all purchased materials and purchase orders, monitor supplier cost and activity, and organize and manage inventory for serialized material. Serialized materials can be received from a work order, supplier, requisition, employee, or account.
|
|
 PREREQUISITES:
- Tap Receive from the menu.
- On the Material panel, select a Storeroom from the drop-down list. This changes the list of materials. Materials can only be selected from one storeroom at a time.
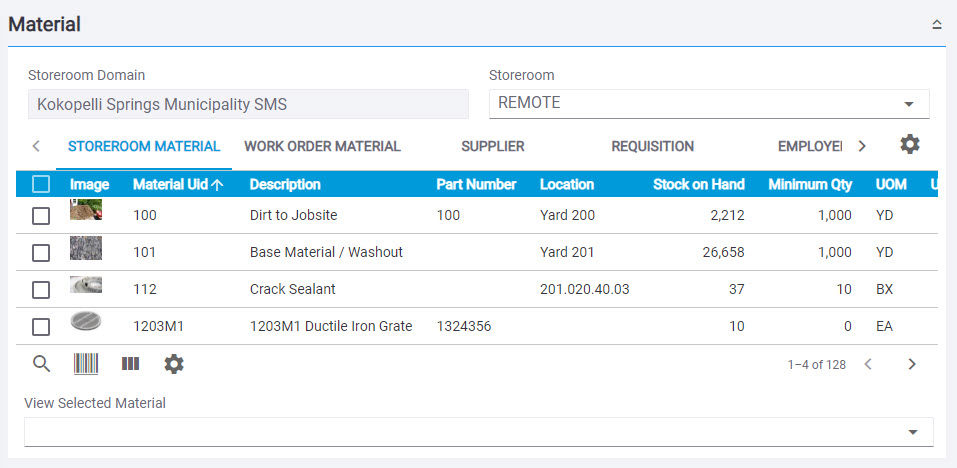
- Select one material from the list. See Search Materials for more information on using the search tabs to find materials.
 NOTE: Only one serialized material can be selected at a time.
- Enter the information in the Receive panel to receive the material, including the Quantity,
 TIP: If the desired supplier doesn't appear in the Supplier drop-down list, see Add a Supplier to Material for information on adding suppliers to material items.

For an explanation of the fields found on the Receive panel, see Receive Transaction Fields.
- Tap Add to List.
The Serial Info Needed panel opens.
- Tap Upload CSV or Manual Entry to add the serial numbers for the material.
- Tap Upload CSV.
TIP: The .csv template file is located in the Upload a CSV File panel. Tap Download Template to download the template.
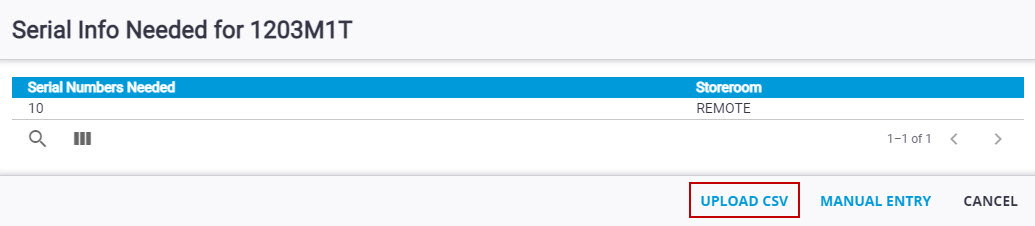
- Tap Download Template to download the .csv template file.
NOTE: The columns in the template are Serial Number, Warranty Date, Expiration Date, Storeroom, and Unit Cost. The Serial Number column is a required column. The Date columns are optional. The Storeroom column may be left blank if only one storeroom has stock on hand. Otherwise, it is a required column. The Unit Cost column is optional, to be used if converting the cost type to serial and individual unit costs for each serial number is desired. Otherwise, the material’s current unit cost will be applied to each serial number. The first row of the .csv file will be ignored by Storeroom, as it is meant to be used for headers.
- Tap Choose File and browse to the file.

- Tap Done.

- Tap Manual Entry.
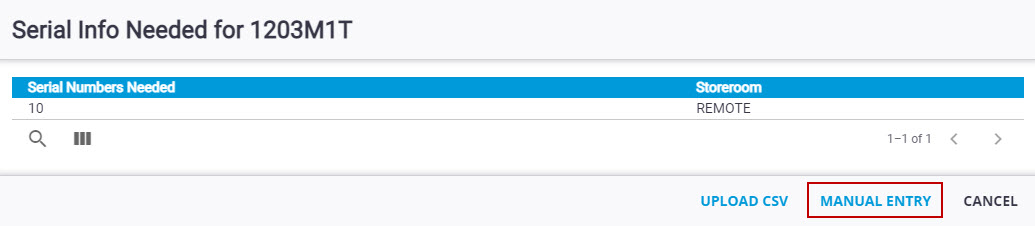
- Enter the serial number in the Serial Number field or use Scan Barcode to scan the serial number.
- Add the Warranty Date and Expiration Date using the calendar icon.
- Add the unit cost in the Unit Cost field, if desired.
- Tap Add in the Serial Number field to add to the Assigned panel.

- When all the serial numbers are added, tap Done.
NOTE: Done is grayed out until all of the serial numbers have been added.
The material is added to the Pending Receives panel.
- If you would like to add other materials to this receive transaction, tap Clear in the Receive panel to clear the fields, then add another material to the list.
- To remove one of the records from the list, select the record and tap Delete selected records.
- To add an attachment, tap Add and browse to the desired file.
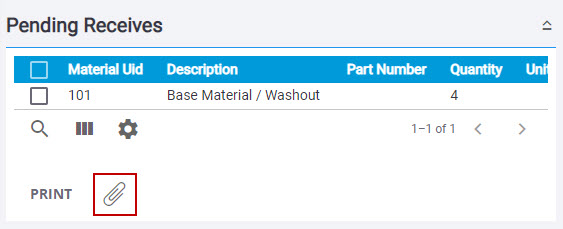
- Tap Commit