Calendar View for PLL
Users can view and send schedules, add events, and reassign PLL tasks from the calendar view in Workload.
- Use the filter icon to select the filter parameters you would like to include. See Filter the Work for more information.
The calendar populates the PLL tasks according to the filter parameters.
- Scroll on the outside of the page to view the entire calendar.
- Scroll within each calendar day to view the scheduled work for the day.
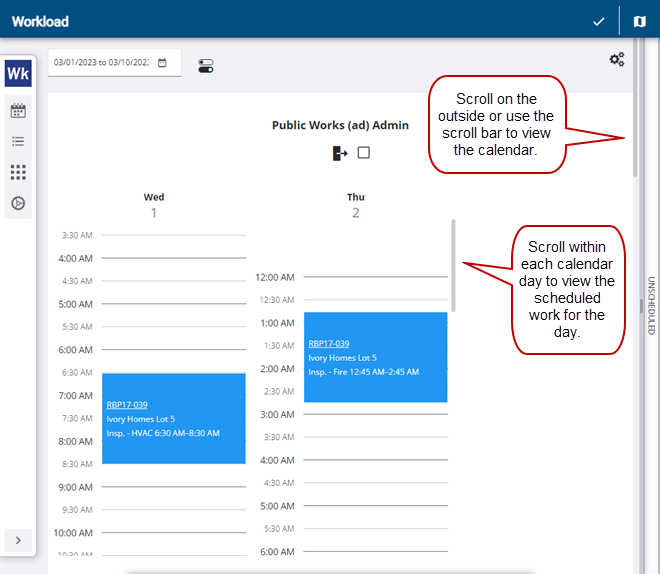
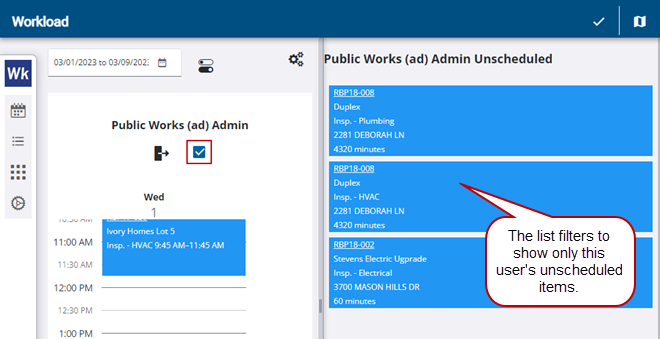
The work assigned to each inspector appear in the calendar.
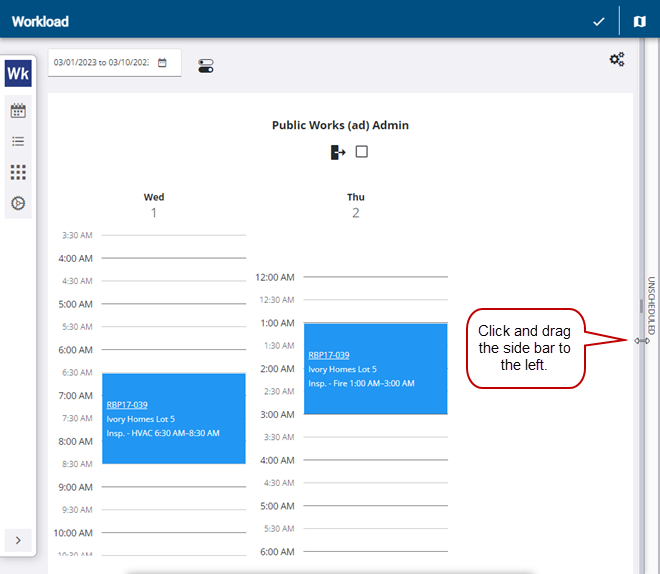
Unscheduled items are available tasks that have not been scheduled or assigned. You can filter this list by selecting the Show only this user's unscheduled items check box under the inspector name on the schedule to only show that user's unscheduled items.
- To view unscheduled work, hover over the Unscheduled side bar to click and drag it to the left.
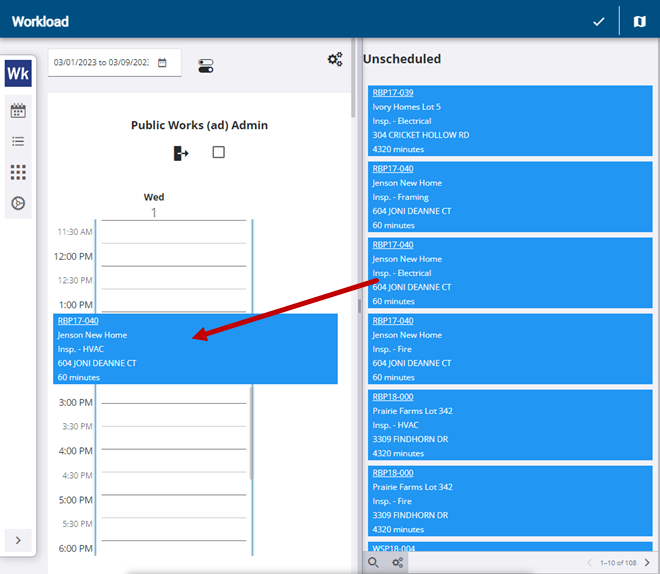
- Click and drag unscheduled work to the calendar view and drop it at the time you want the work to start.
 NOTE: When a task without a target start or end date is dragged onto the calendar, the date and time where the task is dropped populates the task's target start date. The duration set on the task is then used to determine the target end date.
- If you would like to select multiple unscheduled work entries, click Turn on multi select in the upper-right corner of the page.

When you drop the multiple selections on the schedule, you will see Conflict (X Events). This means that all selections were dropped on the same scheduled time.
- Click within the Conflict (X Events) box on the schedule.
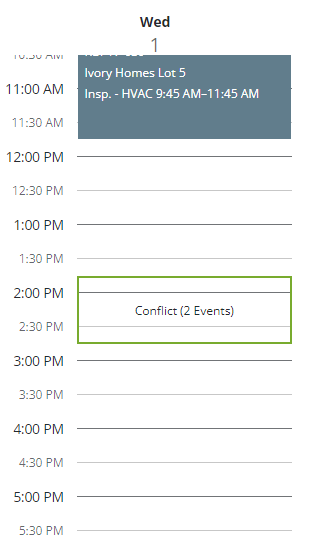
- Click and drag one of the work activities to a different time or day when it doesn't overlap with another.
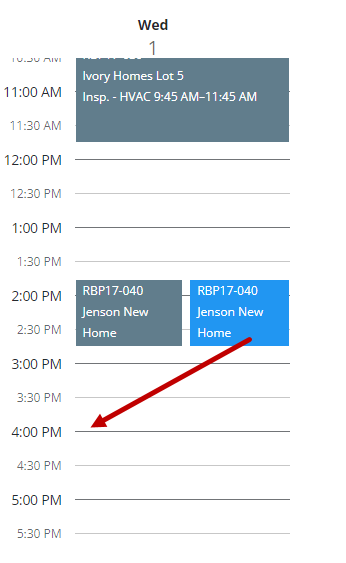
Similarly, you can click and drag one or multiple work entries from the schedule to the Unscheduled list.
- Click the Show only user's unscheduled items check box under the inspector name on the schedule to only show that user's unscheduled items.
Users can add events or work activities to the calendar view in Workload. This varies depending on the Mode selected in Settings. See the Customize Calendar Settings section on this page.
NOTE: The Event option is used to block out time in the user's schedule for PTO or appointments, etc. The Work Activity option is to schedule case tasks, work orders, and inspections.
Interval Mode
- Click in the schedule at the time you want to add an event or work activity.
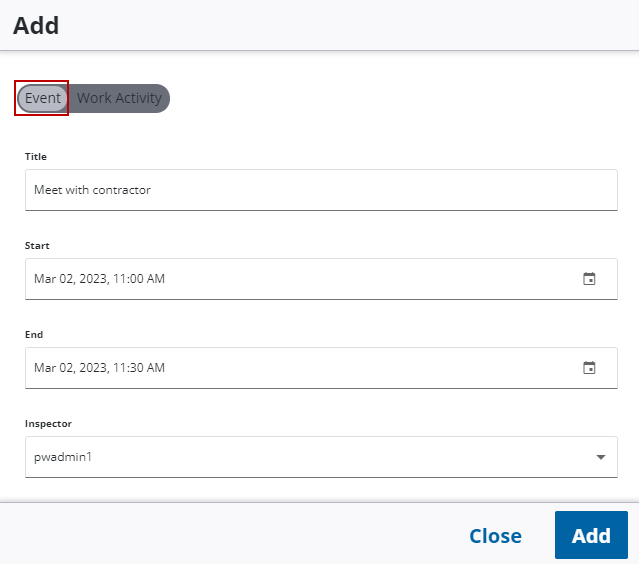
- To add an event, click Event.
- Enter a Title, Start and End time, and select the Inspector you want the event assigned to.
- Click Add.
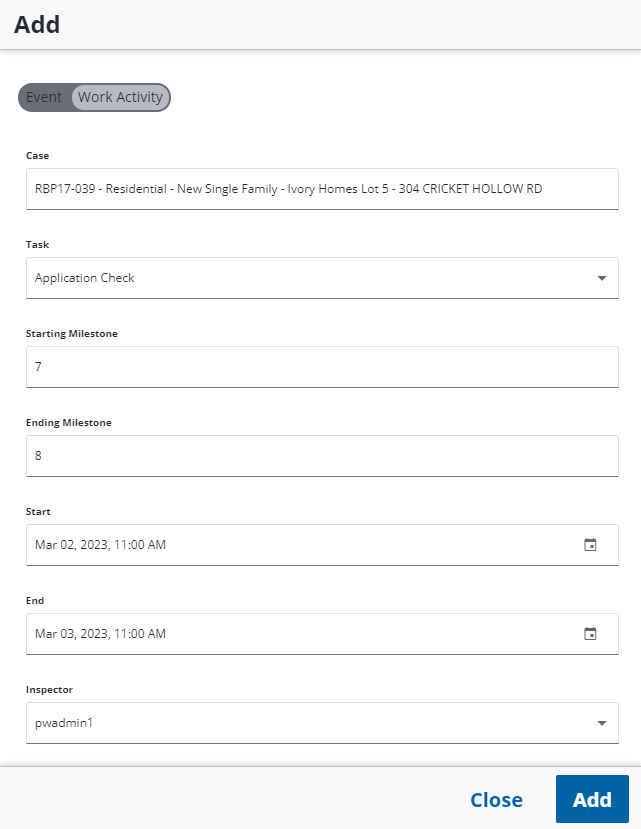
- To add a work activity, click Work Activity.
- Enter the Case, select a Task, enter the Starting Milestone and Ending Milestone, select the Start and End time, and the Inspector you want the work activity assigned to.
- Click Add.
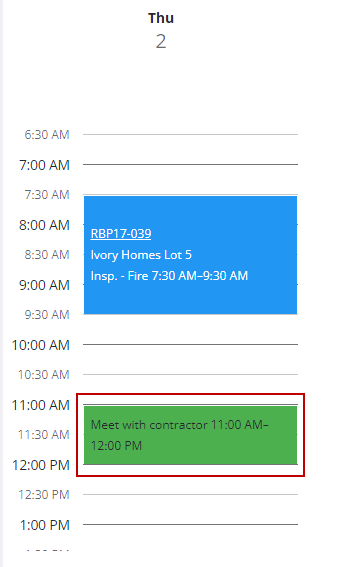
The new event or work activity appears on the calendar view.
Condensed and Sequence Mode
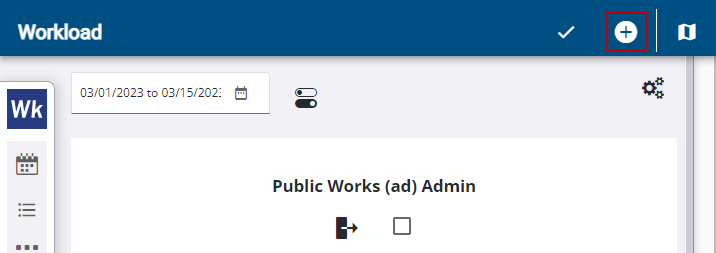
- Click the Add Event icon in the upper-right corner of the page.
- To add an event, click Event.
- Enter a Title, Start and End time, and select the Inspector you want the event assigned to.
- Click Add.
- To add a work activity, click Work Activity.
- Enter the Case, select a Task, enter the Starting Milestone and Ending Milestone, select the Start and End time, and the Inspector you want the work activity assigned to.
- Click Add.
The new event or work activity appears on the calendar view.
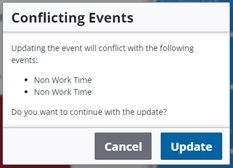
Workload shows the days or times an inspector is not available on their schedule. This is determined by the inspector's configured workload days, as well as any holidays or inspector's days off. If an event or work activity is scheduled when the inspector is unavailable, a Conflicting Events message opens that allows the user to cancel or continue with the update. If the user proceeds with the update, the schedule shows a conflict.
Users can edit events or work activities, such as changing the Inspector you want the work activity assigned to, in the calendar view in Workload.
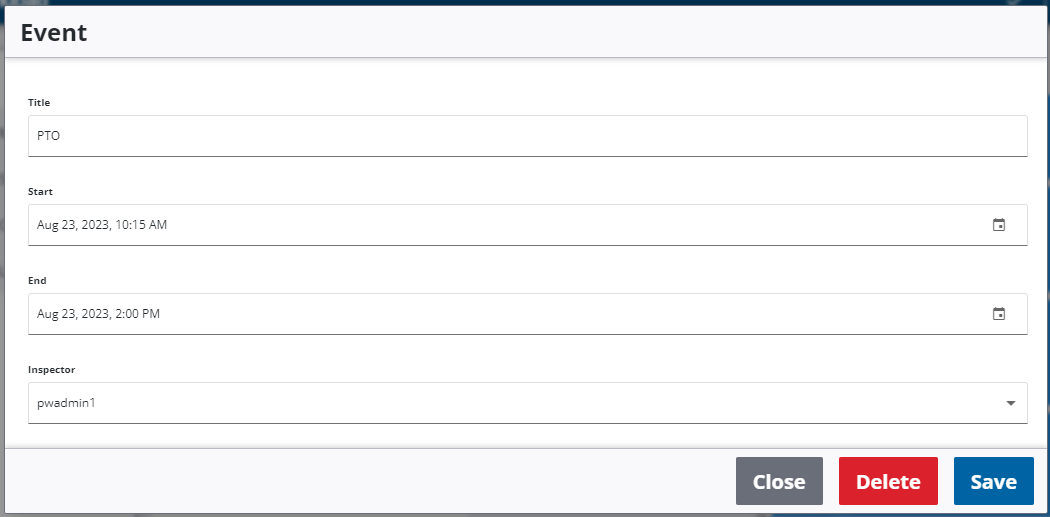
Event
-
Click on an event.
The Event panel opens.
-
Edit the Title, Start and End time, and Inspector assigned to the event.
-
Click Delete to delete the event.
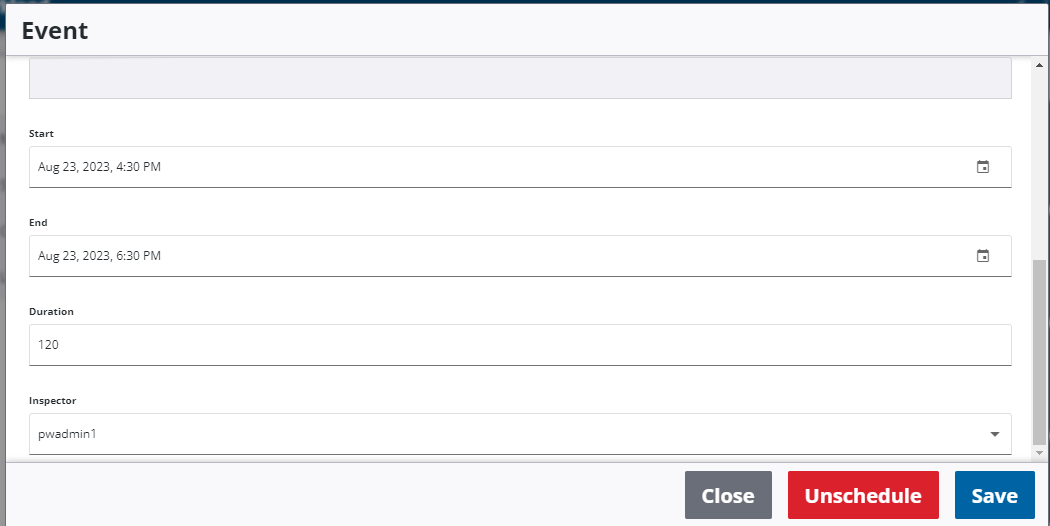
Work Activity
-
Click on a work activity.
The Work Activity Event panel opens.
-
Edit the Start and End time, Duration, and Inspector assigned to the work activity.
-
Click Unschedule to unschedule the work activity.
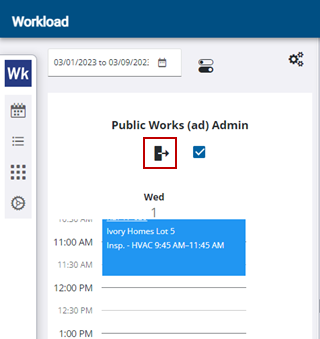
The user's calendar can be sent to them via email from Workload.
- Click Send User Calendar to send the user's calendar.
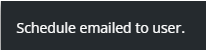
- A message appears at the bottom of the page saying Schedule emailed to user.
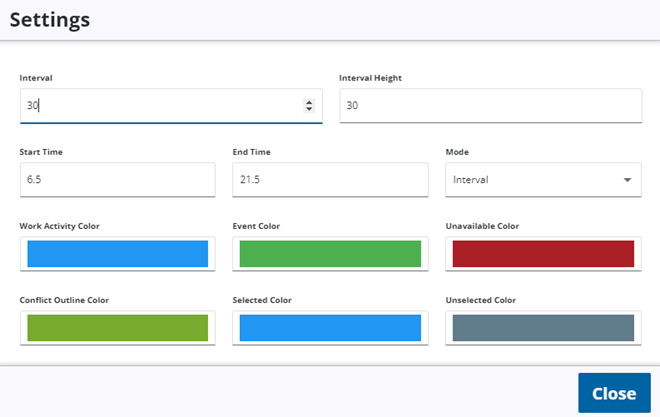
Users can configure the appearance settings of the calendar.
- Select the Interval you want displayed on the calendar. This refers to a minute time interval. For example, if you enter 30, the calendar will display every 30 minutes. If you enter 60, the calendar will display every 60 minutes or hour.
- Select the Interval Height you want displayed on the calendar. This refers to the spacing between the time slots on the calendar. For example, if you enter 30, the time slot spacing is more spread out. If you enter 15, the time slot spacing is closer together.
- Select the Start Time you want displayed on the calendar. This refers to start time you want displayed on the calendar. This is based on military time. For example, if you want the calendar to start displaying at 7 AM, enter 7 in the field. If you want it to start at 6:30 AM, enter 6.5 in the field.
- Select the End Time you want displayed on the calendar. This refers to the end time you want displayed on the calendar. This is based on military time. For example, if you want the calendar to end at 8 PM, enter 20 in the field. If you want it to end at 9:30 PM, enter 21.5 in the field.
- Select the Mode you want displayed on the calendar. The Interval option displays the calendar with the times displayed. The Condensed option displays the user's available times as well as the assigned work. The Sequence options shows the number of assigned work for the user and when that work is scheduled.
- Select the Work Activity Color you want displayed on the calendar. This shows when a work activity has been added to the calendar.
- Select the Event Color you want displayed on the calendar. This shows when an event has been added to the calendar.
- Select the Unavailable Color you want displayed on the calendar. This shows when the user has scheduled that they are unavailable at a certain time. This is based on configured workload days as well as holidays and inspector days off.
- Select the Conflict Outline Color you want displayed on the calendar. This shows when there is a schedule conflict on the calendar with two or more events.
- Select the Selected Color you want displayed on the calendar. This is specific to the multiple selection option. When one or multiple items are selected, they turn this color.
- Select the Unselected Color you want displayed on the calendar. This is specific to the multiple selection option. When turned on, all work activities on the page turn this color.