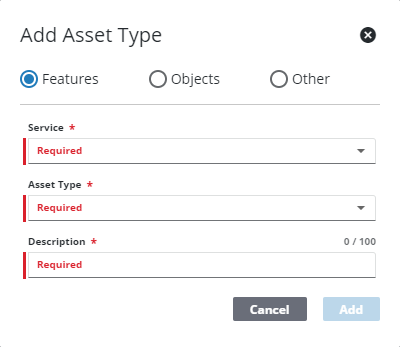
Add an Asset Type
Asset types can be added to asset groups.
- Select an asset group from the Asset Configuration panel and click Add Asset Type to add an asset type to that asset group.
- Select the asset category (Features, Objects, or Other).
- If you selected Features or Objects, select the GIS Service endpoint for the asset type. If you selected Other, enter the Other Type and Description.
- Select the Asset Type and enter a Description, then click Add.
 NOTE: The name entered for the Description of the asset type corresponds with the name of the layer in the service that is selected. This name is stored as the asset's code in the database. The code is used to link the asset type to historical work records and work templates. Spaces, underscores, and dashes can be used in the Description, but no other special characters are recommended.
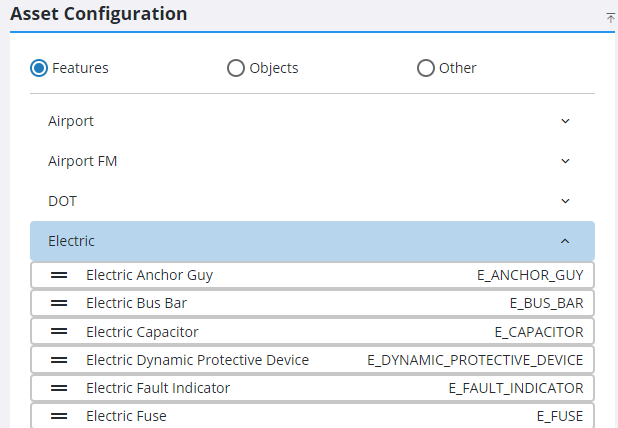
- Click the arrow next to any asset group to expand it and view the asset types in that asset group.
 TIP: To move an asset type to a different asset group, click Move next to the desired asset type.
When you click an asset type, the Asset Field Configuration panel displays on the right.
The Asset Field Configuration panel identifies which asset attributes are displayed and how they are displayed throughout Cityworks.
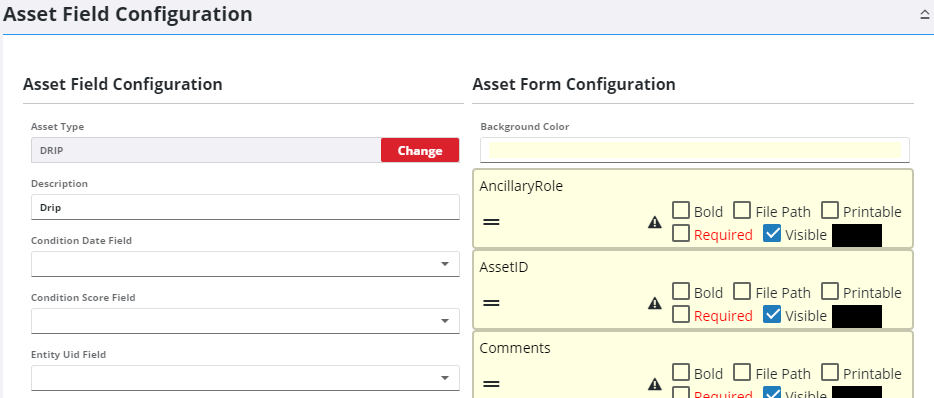
- Enter or edit the Description, Condition Date Field, Condition Score Field, Entity Uid Field, Display Field, Primary Image Field, Default Image Directory, Facility ID Field, and Level ID Field.
 IMPORTANT: The GlobalID should not be mapped to the Entity Uid Field. The values of the GlobalID field can potentially change when certain processes are performed on the Esri side, which could orphan data in the Cityworks database.
See How To Define an Asset's EntityUID in Designer and 11668: Using a GUID Data Type as the EntityUID for Cityworks Server AMS/PLL on MyCityworks for more information on populating the Entity Uid Field.
NOTE: The attributes set as the Entity Uid Field and Display Field are always visible and the Visible check box cannot be cleared under Asset Form Configuration.
For an explanation of fields found on this page, see Asset Groups Fields for more information.
The Asset Form Configuration section of the Asset Field Configuration panel allows you to format attributes displayed throughout Cityworks by order, visibility, background color, text color, and whether or not the text appears bold. You can also set the File Path for asset images, if it can be printed on a work order print template, and whether or not the attribute is required on an inspection. See 10521: Server Functions that Utilize the Asset Form Configuration in Designer on MyCityworks for more information on what these settings affect in Cityworks.
Compare the following two images to see how the Asset Form Configuration settings are reflected in Office.

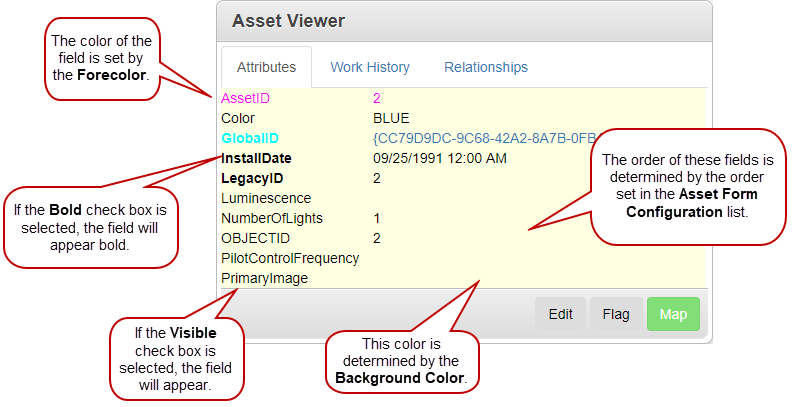
- To change the order that the fields are displayed across Cityworks, click the reorder icon next to the attribute field and drag it to the desired location.
- Click in the Background Color box to set the background color for the attribute fields.
- Select Bold to make the text bold.
- Select Required to mark this attribute as required on the Entity panel of an inspection. It appears highlighted in red and the inspection cannot be closed until all Required fields that are designated as editable on an inspection template are populated. See Configure Entities on Custom Inspection Templates for more information.
- Select Visible to make this attribute visible.
- Click in the color box to change the color of the text.
NOTE: The ObjectID field is visible regardless of whether or not the Visible check box is selected. On the GIS search results page, the ObjectID is always displayed first, even if it has been reordered in the Asset Form Configuration list, because it is used to display the hyperlink to access the Asset Viewer page.
The following table explains where these formatting settings apply in Office:
|
Location |
Background Color |
Bold |
Visible |
Color |
Reorder |
Required |
|---|---|---|---|---|---|---|
|
Admin > Asset Groups > Asset Form Configuration panel |
X |
X |
|
X |
X |
|
|
Asset Viewer page |
X |
X |
X |
X |
X |
|
|
GIS Search > Search GIS data by entering / selecting values for the following attributes section |
X |
X |
X |
X |
X |
|
|
GIS Search > search results |
|
|
X |
|
X |
|
|
Inspection > Entity panel |
X |
X |
X |
X |
X |
X |
|
Equipment Change Out |
X |
X |
X |
X |
X |
|
|
Asset Analytics |
X |
X |
X |
X |
X |
|
|
Select Features / Objects (related assets page) |
X |
X |
X |
X |
X |
|
|
Layer Search > Field |
|
|
X |
|
|
|
|
Map > Results panel |
|
|
X |
|
X |
|
Besides setting how the attributes appear throughout Cityworks, the following settings can also be selected:
- Select File Path if asset images are stored on a network drive.
- Select Printable to set this field as one that can be added to a customized work order .docx print template. Print preferences are configured on the General tab of the Preferences page.
If a field is no longer present or is not being read by the current GIS connection, an X appears to the right of the field name.
NOTE: Admin automatically saves the changes you make. A notification pops up at the bottom to verify changes have been saved.