Configure General Preferences
The General tab contains overall preferences.
- From the General tab or home page, click Preferences.
The Domain Preferences panel automatically opens to the General tab.
- Select Allow Changes to Initiated Date/Time to allow users to change the initiated date/time on service requests and work orders. The default for this field is not selected.
 NOTE: Date/time stamps for initiating service requests and/or work orders are tracked in the Audit Log, so the original date/time can still be viewed.
- Select Allow Comments to be Deleted to allow users to delete their own comments, and domain administrators to delete any comment. Deleted comments may be tracked in the audit log. The default is not selected.
NOTE: If this preference is enabled, a delete icon will appear next to each comment.
- Select Allow Comments to be Edited to allow users to edit their own comments, and domain administrators to edit any comment. Comment edits may be tracked in the audit log. The default is not selected.
NOTE: If this preference is enabled, an edit icon will appear next to each comment.
- Select Ascending or Descending for the Default Comment Sort Order field. Comments are sorted by the date added. The default is Ascending.
- Enter the Attachment Root Directory, the file path for the folder where attachments are stored. See 10630: Configuring Server Attachments on MyCityworks for more information.
NOTE: See Set the Attachment Root Directory for more information on the Attachment Root Directory.
- In the Default Office Layout field select the name of the folder where the modified XML files for customizing the Office interface are stored. This folder is found in the website directory under ...inetpub\wwwroot\<site_name>\WebSite\Xml. The default is Default. See Cityworks Office and Tablet Customization in the Cityworks UI Customization 15.6 Guide for more information.
- In the Default Tablet Layout field select the name of the folder where the modified XML files for customizing the Tablet interface are stored. This folder is found in the website directory under ...inetpub\wwwroot\<site_name>\WebSite\Xml. The default is Field. See Cityworks Office and Tablet Customization in the Cityworks UI Customization 15.6 Guide for more information.
NOTE: When Cityworks is installed, this field is set as Default out-of-the-box. If you want to use the Field layout folder provided out-of-the-box, select that field.
- Select the Enable eURL for new searches check box to enable eURL for any searches created after the preference is selected. Any existing searches, created prior to upgrading to 15.4, will have eURL enabled by default. You can also enable eURL on individual saved searches if you are a domain administrator or you created the saved search. Please see Utilize eURL in Cityworks on MyCityworks for more information.
- Select Enable Storeroom to enable Storeroom for your site. This preference will not appear if you are not licensed for Storeroom or if you are not a Cityworks administrator.
- Select Allow Negative Stock in Storeroom to allow negative stock for current and weight average cost types in Storeroom. If selected, Storeroom will show an error for LIFO and FIFO when more material is issued than what's in stock, but not for weighted average or current cost types. The default is not selected. This preference will not appear if you are not licensed for Storeroom.
- Add Holidays observed by your organization to avoid having cyclical work orders start on a holiday. See Add Holidays for more information.
- Select Include Inactive Employees in Searches to allow searches to be performed on inactive employees. The default is not selected.
- Select Include Inactive Templates and Tasks in Searches to allow searches to be performed on inactive request templates, work order templates, custom inspection templates, and tasks. The default is not selected.
- In the Max New Page Open Work Activities field, enter the number of open work activities to display when a user creates a new work order or inspection. Only work activities with the same description will display. The default is 10.
- In the Maximum Number of Records Returned through Search Query field, enter the maximum number of records returned through a search. The default is 1000. Users will receive a warning when the maximum number of records has been reached so that they are aware that they might not have accessed all the records fitting the search parameters.
- In the Paging Rows Per Grid field, enter the number of rows shown in a panel when searching. The default is 100 per page.
- In the Webhook User Api Token Days, enter the number of days a webhook generated user API token is valid before it expires. Enter -1 to signify no expiration for the token.
- In the Print Output Type field, select either Docx or Crystal. If you select Docx, service requests, work orders, and custom inspections will be printed as Microsoft Word .docx files. The templates must be stored at ...\inetpub\wwwroot\<site_alias>WebSite\PrintDocx. If you select Crystal, the records will be printed as Crystal Report PDFs. The templates must be stored at ...\inetpub\wwwroot\<site_alias>\WebSite\PrintCrystal. Standard inspections will always print as Crystal Report PDFs. The default for all other is Docx.
NOTE: For more information on using the Print Output Type preference, please see 12700: Utilize Crystal Reports for Print Templates and Word Templates for Email Notifications and Vice-Versa on MyCityworks.
- Add Priority Values that can be assigned to a service request, work order, or custom inspection. See Add Priority Values for more information.
In the Request Tree Text Display, Equipment Tree Text Display, Material Tree Text Display, and Task Tree Text Display fields, administrators can customize how service request, equipment, material, and task hierarchies are displayed in the current domain.
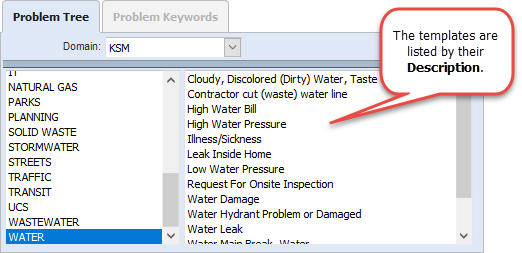
For example, if Description is selected as the Request Tree Text Display, it will look like the following image:
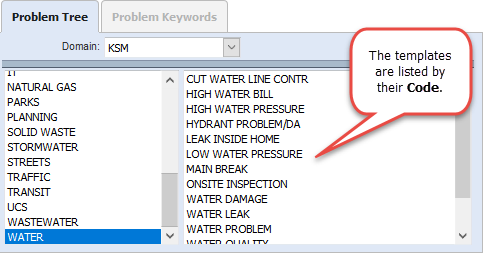
If Code is selected as the Request Tree Text Display, it will look like the following image:
If Code~Description is selected as the Request Tree Text Display, it will look like the following image:
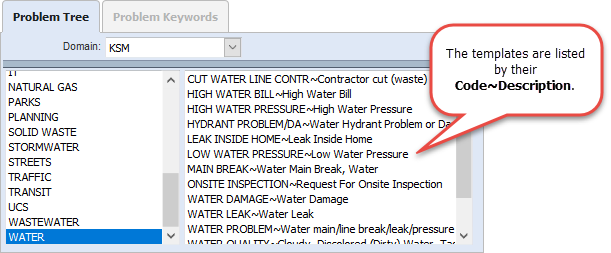
These hierarchies appear when creating a new service request in the Problem Tree panel, adding equipment to a work order in the Equipment/Entity/Task panel and in ELM, adding material to a work order in the Material/Entity/Task panel and in ELM, adding material to a storeroom transaction in the Material panel, adding a task to a work order in the Task/Entity panel, and so on.
NOTE: The Description displays the description defined by the administrator, the Code displays the code defined by the administrator, and Code~Description displays both the code and description defined by the administrator on the Service Request Templates, Equipment, Material, and Task Templates pages. If you are licensed for Storeroom, the Storeroom administrator defines the material Code and Description under Config > Material.
- In the Request Tree Text Display field, select Code, Code~Description, or Description to determine the hierarchy view for service requests. The default is Description.
- In the Equipment Tree Text Display field, select Code, Code~Description, or Description to determine the hierarchy view for equipment. The default is Description.
- In the Material Tree Text Display field, select Code, Code~Description, or Description to determine the hierarchy view for material. The default is Description.
- In the Task Tree Text Display field, select Code, Code~Description, or Description to determine the hierarchy view for tasks. The default is Description.
NOTE: To configure these text display settings for an individual user, see Configure Text Display in Cityworks for more information.
- Select Use Dynamic Cost Codes to enable Configure Dynamic Cost Codes and Add or Edit a Custom Job Code. The default is not selected.
NOTE: Do not use dynamic cost codes if asset- or task-based costs are needed as they are not yet supported in Cityworks.
The Email preferences allow Cityworks to send internal emails to designated employees and external emails to citizens. Emails can be sent at certain times, such as when a service request or work order is created or closed, when plans for a new building are approved, or when a Submit To or Dispatch To field is changed.
- Enter the Email preferences. See Configure Email Settings for more information.
NOTE: These Email settings are also used for password recovery. When a user forgets their password, they will be sent an email to reset their password. If the user belongs to multiple domains, the default domain's Email settings will be used.
The Weather API section allows you to configure an API key to display a specific location's weather in the inbox. This functionality was removed at 15.3, and this preference only applies to existing weather widgets added in the inbox before 15.3. See Weather Widget Functionality Removed on MyCityworks for more information.
- Enter the API Key.
NOTE: