Install Cityworks
Office Companion is meant to be used in conjunction with a Cityworks 23.x site. This section includes the steps necessary to install a new Cityworks site.
 NOTE: If you must do a manual
|
|
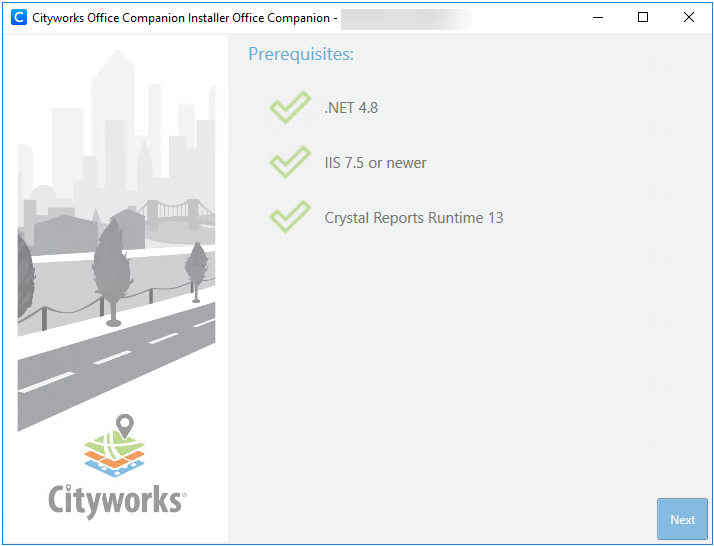
 PREREQUISITES:
- Navigate to where the Cityworks installer is located.
- Right-click the installer and select Run as Administrator to launch the installer.
The installer automatically checks to make sure all the prerequisites are installed. If an application is missing, the installer displays a message instructing you to install the needed prerequisites.
If all prerequisites are properly installed, three green check marks appear.
- Click Next.
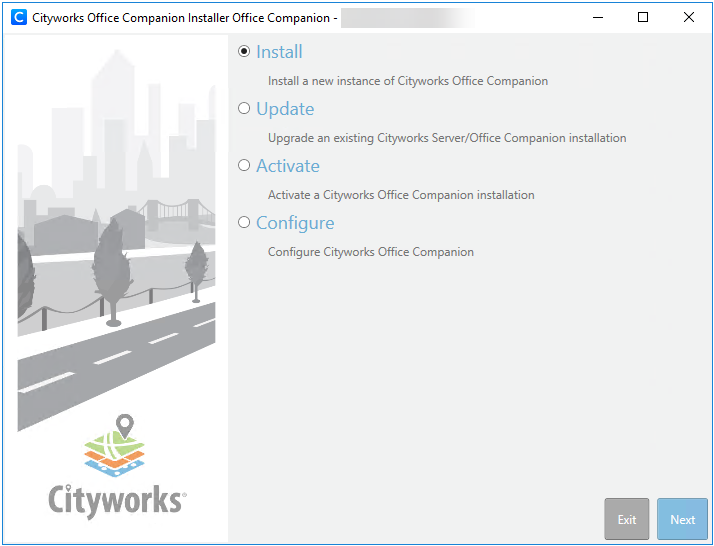
The installer includes the following functions:
- Install: This option is used when first creating a Cityworks site.
- Update: This option is used when updating an existing Cityworks site.
- Activate: This option activates a Cityworks license file. See Activate for more information.
- Configure: This option configures the server, SMTP options, the impersonate user credentials, and timeout settings.
- Select the Install option and click Next.
- Select a Web Site under which the site is installed. In this case, select Default Web Site.
- Give the site an Alias and define the physical path where the Cityworks files are stored if the path is different from the default specified in Install Location.
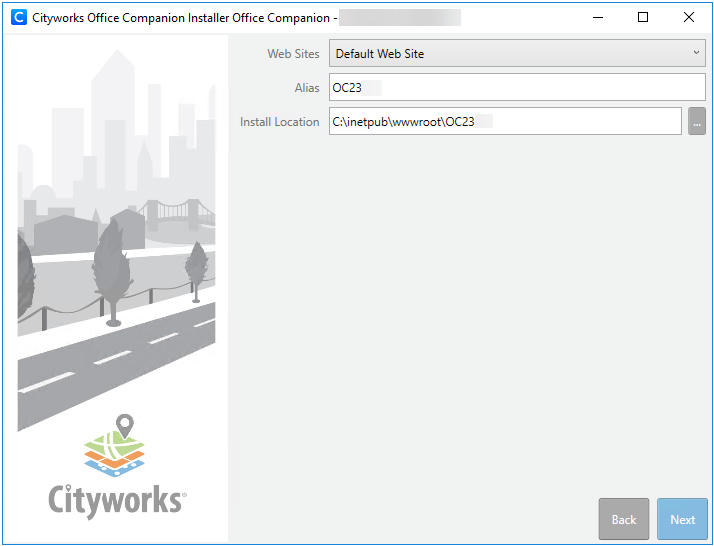
NOTE: The Default Web Site or the default directory from which Cityworks is published is added to its own application pool, the CityworksAppPool, which is now managed by the ApplicationPoolIdentity user, .NET Framework/.NET CLR version 4.0, and set in Integrated managed pipeline mode via the installer. If there is already an application pool with the same name present, the installer simply updates the settings to match what has been specified for the particular build of Cityworks involved.
- Click Next.
- On the Required tab, enter the following:
- Select either SQL Server or Oracle for the Cityworks database.
- Enter the Server instance that the database resides on.
- Enter the password for the Azteca user in the Azteca Password field.
- Select the Database name.
- Select the impersonate user on the machine you wish Cityworks to utilize.
- Enter the impersonate user password and confirm it.
 IMPORTANT: The impersonate user's password cannot contain special characters.
Starting with 10.1, ArcGIS Server no longer uses the SOM and SOC. At 10.0, you had to manage accounts for each, but starting with 10.1 SP1 you only have to manage one account. This is the ArcGIS Server account (default name assigned is arcgis), which runs the ArcGIS Server process service. This service enables the hosting of GIS services. This is the account that can now be used as the impersonate user.
NOTE: Given the SOE or REST services are being utilized instead of the Geodata service, which requires a local connection, there is no need to have the impersonate user reside on both the server running ArcGIS Server and the (application) server running Cityworks in a distributed environment. The user being referenced as the impersonate user in the installer in this scenario just needs to be a valid account (local or domain) with access to the application server and be placed in the IIS_IUSRS group to gain access to the folders used in printing and the asp.net temp files.
- Select Use Windows Authentication to set the site to use Windows Authentication in IIS and to make the corresponding changes in the Web.config file.
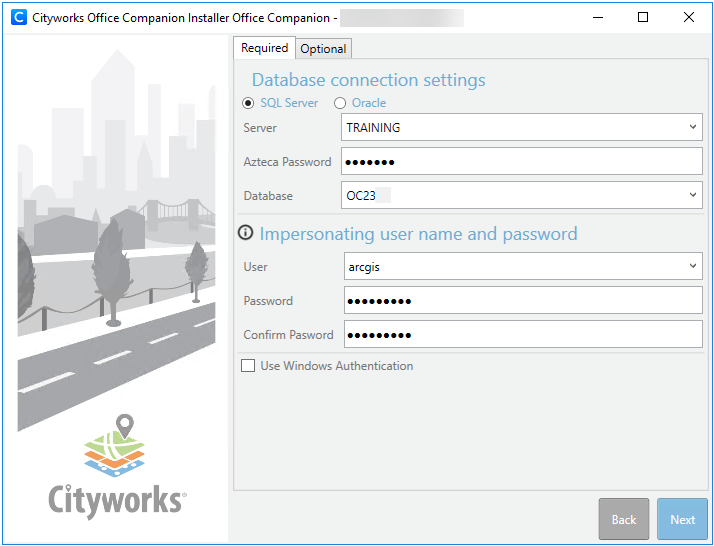
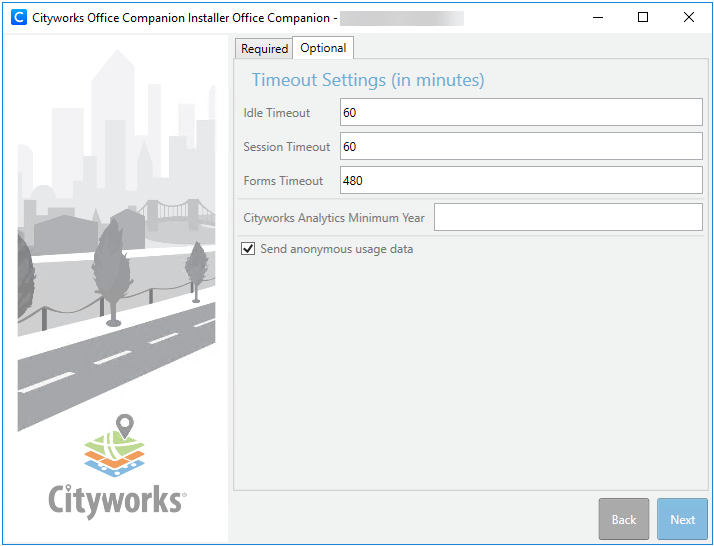
- If desired, click the Optional tab to access additional configuration options.
- The Idle Timeout, Session Timeout, and Forms Timeout settings are set to recommended values of 60, 60, and 480 minutes but can be changed if desired. The Session Timeout and Forms Timeout are stored in the Web.config file and the Idle Timeout corresponds to the CityworksAppPool in IIS.
- If desired, enter a year in the Cityworks Analytics Minimum Year field. This value should correspond with the earliest date that records are present in the REQUEST, WORKORDER, and INSPECTION tables (canned or otherwise—various other tables are involved). Please only change this value if you have records earlier than 2000, as it defaults to 2000 if left blank.
- Select Send anonymous usage data to send Azteca Systems, LLC anonymous usage data about how Cityworks is used.
- Click Next.
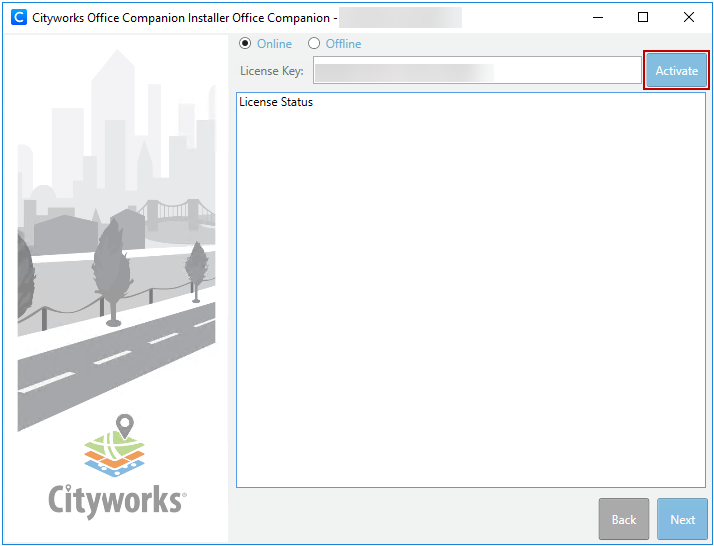
There are two options for activating your license key: Online or Offline. Online is the preferred method, while Offline is only used in rare cases when a site is unable to reach the authorization servers that Azteca Systems uses. Please note that this is usually caused by a proxy server being involved with internet access at the site. See Offline Activation for more information.
- Select Online to activate the license key.
- Enter the License Key number.
- Click Activate. It is important to do this step to avoid issues when installing the site.
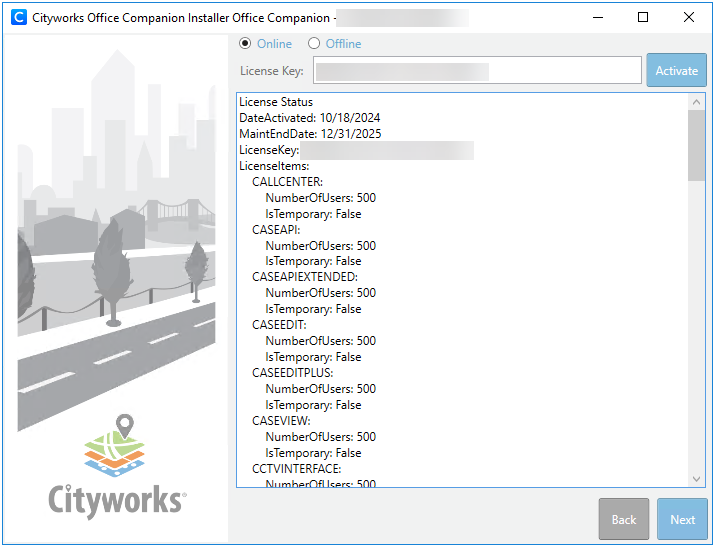
- When the license information has been retrieved and displays in the License Status section, click Next.
- Verify that the site information is correct
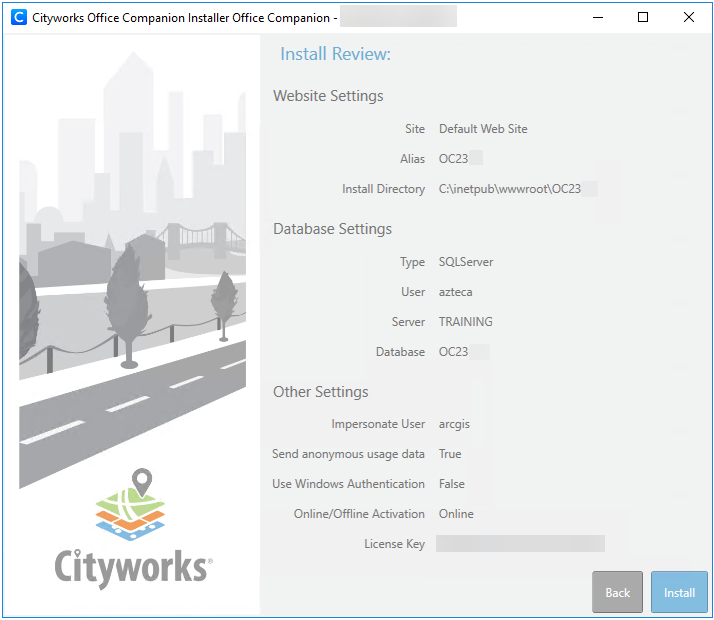
NOTE: If the Alias includes any underscores, the first underscore displays as removed in the Install Directory filepath. This is merely a display issue with the underlying Microsoft label control and does not affect the installation process. The installer runs correctly and the site is named as stated in the Alias and is installed in the correct filepath.
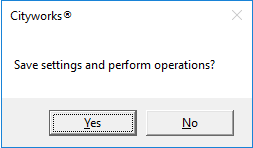
You are asked if you want to proceed.
- Click Yes.
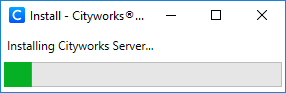
A box with a status bar displays while the
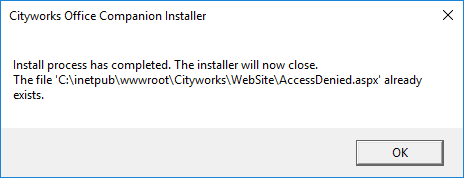
A message box indicates that the
- Click OK.
NOTE: At this point, the site folders have been created under the alias and site location specified in the installer. These include the WebSite and SOE folders.
- If desired, make sure to
The Default Web Site or the default directory from which Cityworks is published are added to its own application pool, the CityworksAppPool, which is managed by the
Make sure the ApplicationPoolIdentity user, or whoever has been assigned as the AppPoolIdentity for the CityworksAppPool, has at least Read permissions to C:\Windows\Temp. Because the ApplicationPoolIdentity user does not appear if you search for it on your local machine, you can assign permissions to the IIS_IUSRS group, which all application pool identities are a part of. If you want to directly assign permissions to the ApplicationPoolIdentity user, use IIS AppPool\<AppPool Name>, for example, IIS AppPool\CityworksAppPool. Please be aware that some configurations may require that the user even have Modify permissions.
NOTE: If you directly assign permissions to the ApplicationPoolIdentity user, an entry is created for it where permissions can be assigned in the future. If you grant permissions to a network share, the ApplicationPoolIdentity uses the Computer object to access it, for example, domain\COMPUTERNAME$. Please see Application Pool Identities in the Microsoft documentation for more information.
Also, the impersonate user may need to be granted Read permissions to C:\Windows\ServiceProfiles\NetworkService\AppData\Local\Temp. The temporary report files written to allow for simultaneous access to the reports reside here instead of the more common C:\Windows\Temp directory. This occurs because one has loaded the user profile of the Application Pool Identity, which is allowed in IIS 7.x, though this feature is disabled by default on Windows 2008, 2008 R2, and Windows Server 2012.
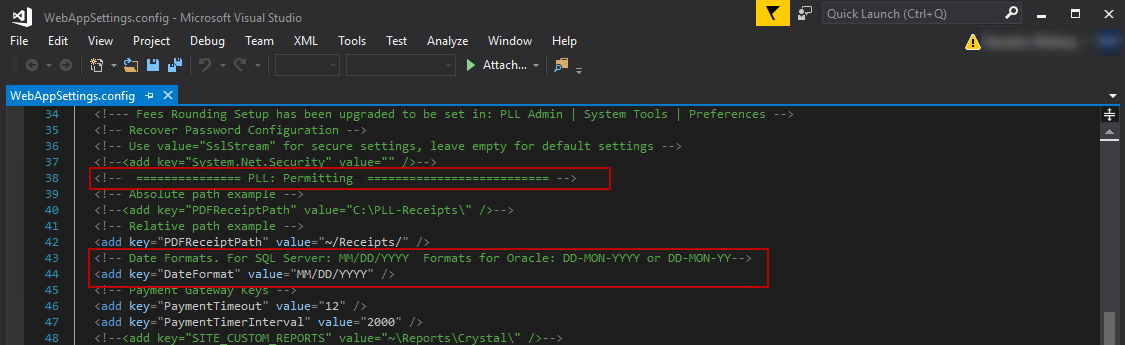
- If you are using PLL and have an Oracle database, open the WebAppSettings.config file (found under ...\inetpub\wwwroot\<site_name>\WebSite) and navigate to the Permitting section. Make sure the DateFormat value is an Oracle date format (either DD-MON-YYYY or DD-MON-YY).
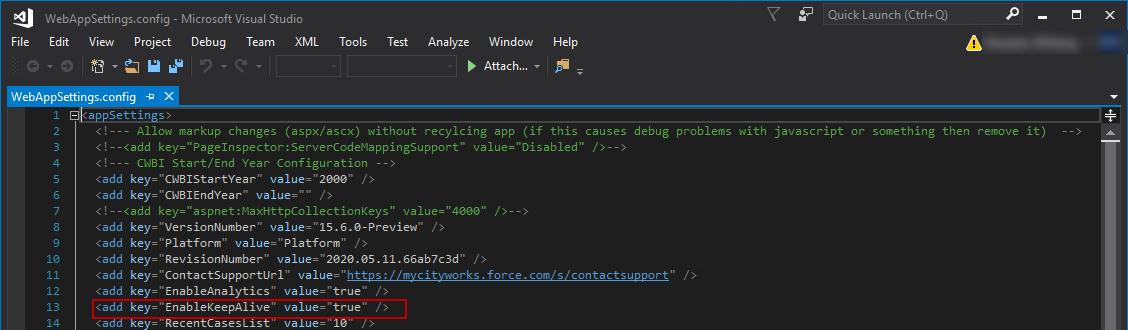
In 15.6, an EnableKeepAlive setting was added to the WebAppSettings.config file. When it is set to true, Office keeps the user's session active, even if the user has not used Office in a while. Some JavaScript is added to the code in Office that tries to keep the session active one minute before the session is set to time out based on the Session Timeout or Forms Timeout settings, depending on whichever one is less, configured in the installer. It is set to true by default.
- Open the WebAppSettings.config file (found under ...\inetpub\wwwroot\<site_name>\WebSite) and change the EnableKeepAlive setting to false to disconnect the user's active session based on the Session Timeout or Forms Timeout settings in the installer.
If you only want to use Office Companion, you still need to run the 23.x Database Manager and Data Migration Manager to ensure your database is up-to-date and your data is migrated correctly. See the Data Migration Manager 1.0 Guide or the Cityworks 23 Install Guide for more information.